Docs/Chat console & conversations/Set up ValueText notifications in the Utility Bar

Set up ValueText notifications in the Utility Bar

Add the ValueText Chat Window to the Utility Bar of any Lightning app so your team can access it from every record and page, not just from a component dropped on a record layout.

Last updated 28 Nov 2025

Open Setup

Open Salesforce and click the gear icon, then select Setup.
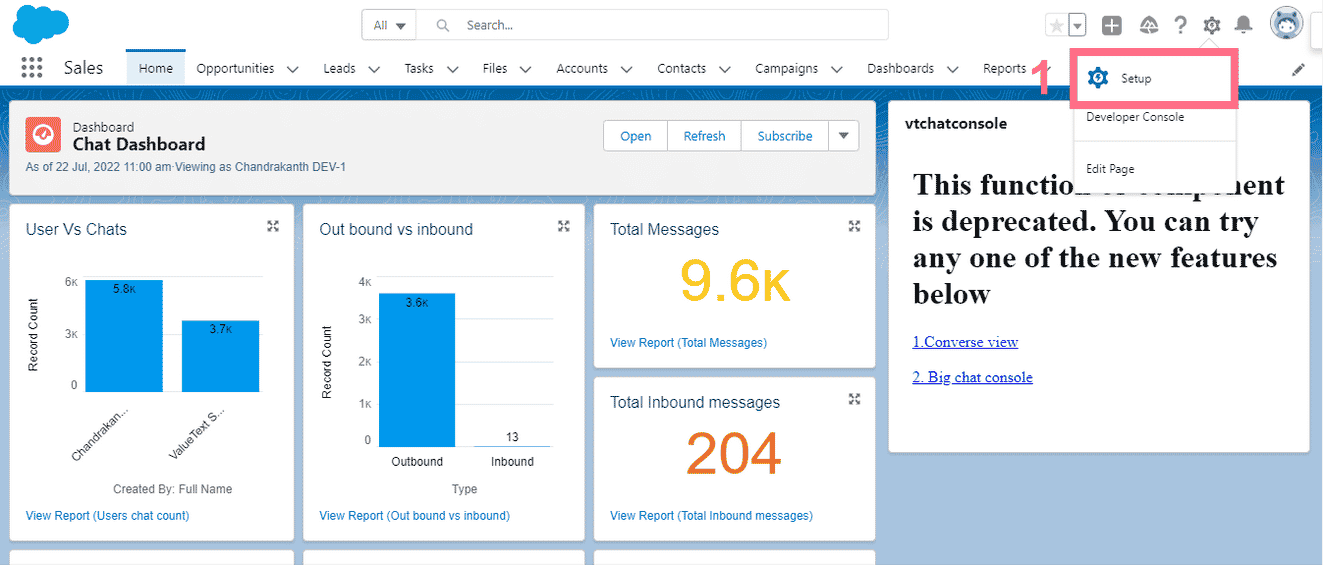
Salesforce Sales Console home page with the gear icon menu open and Setup highlighted.
Fig 01

Open App Manager

Search for App Manager in Quick Find and open it from the results below the search box. App Manager lists every Lightning application in your org.

Choose the Lightning app you want to configure (this guide uses Sales Console) and click Edit.
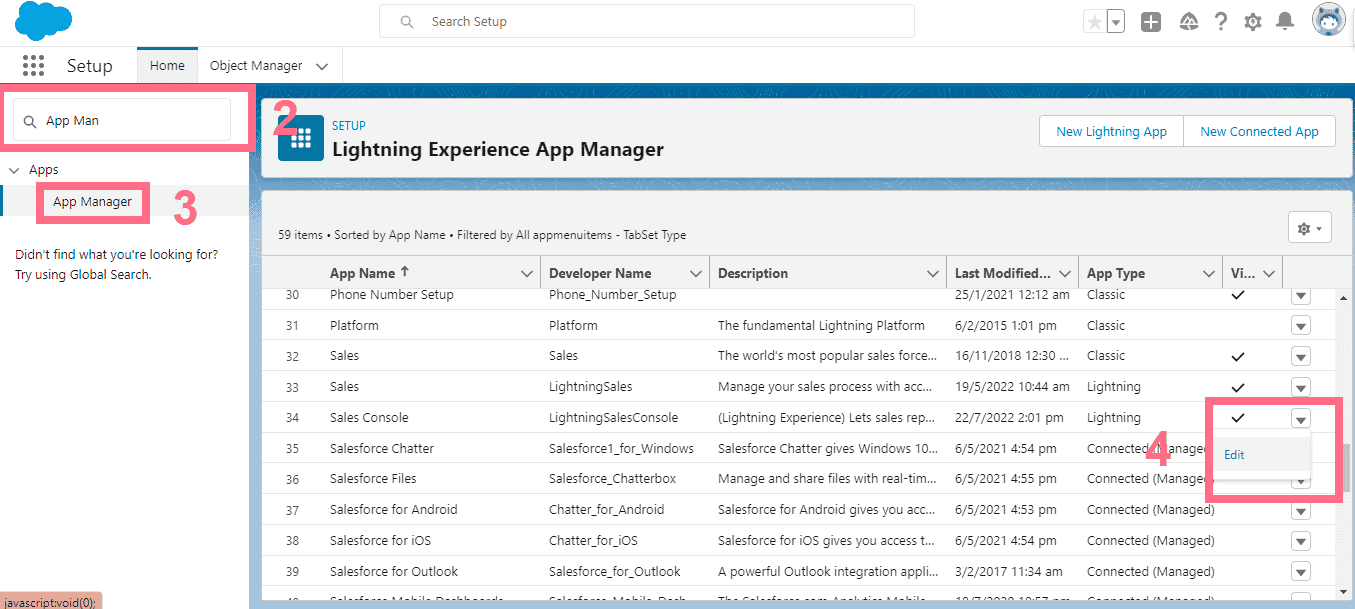
Salesforce Setup page with App Manager typed into the Quick Find search box and the Edit option open in the dropdown for the Sales Console row in the Lightning Experience App Manager list.
Fig 02

Add the ValueText Chat Window utility item

On the app's edit page, click Utility Items (Desktop Only). This opens the Utility Items page.

Click Add Utility Item, then select ValueText Chat Window from the Custom Managed section of the dropdown.
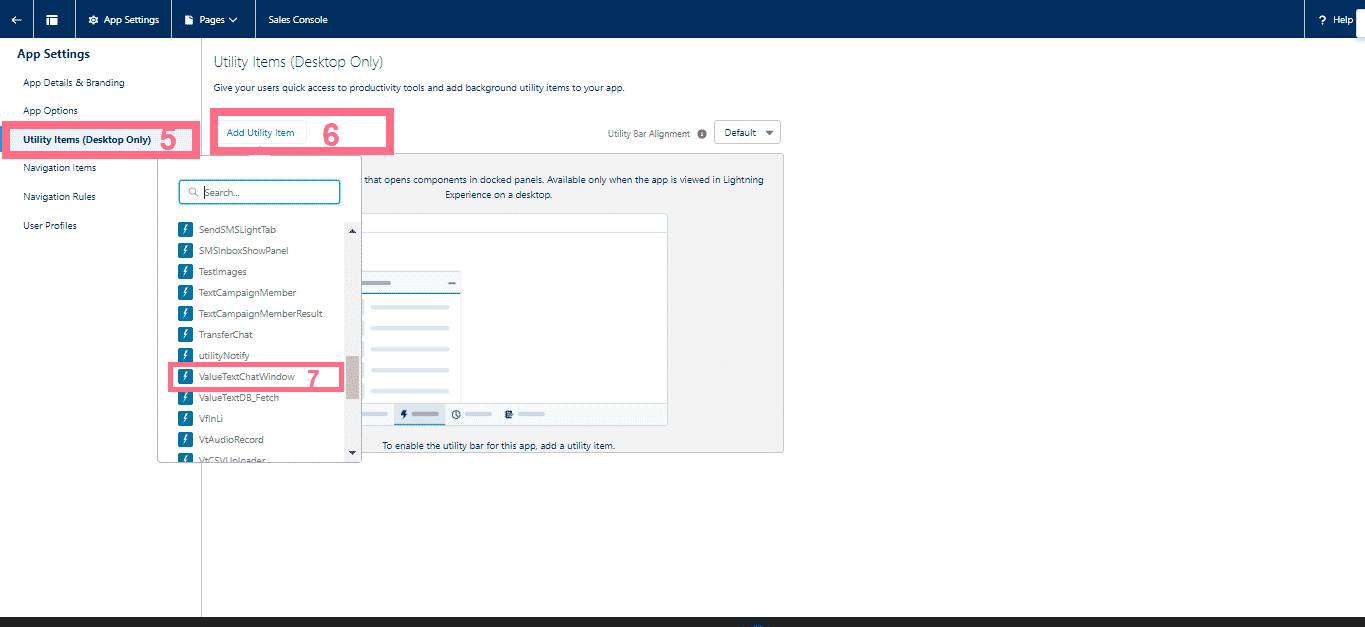
Sales Console app edit page on the Utility Items (Desktop Only) screen, showing the Add Utility Item button and the utility item dropdown list with ValueTextChatWindow highlighted in the Custom Managed section.
Fig 03

Set the panel properties

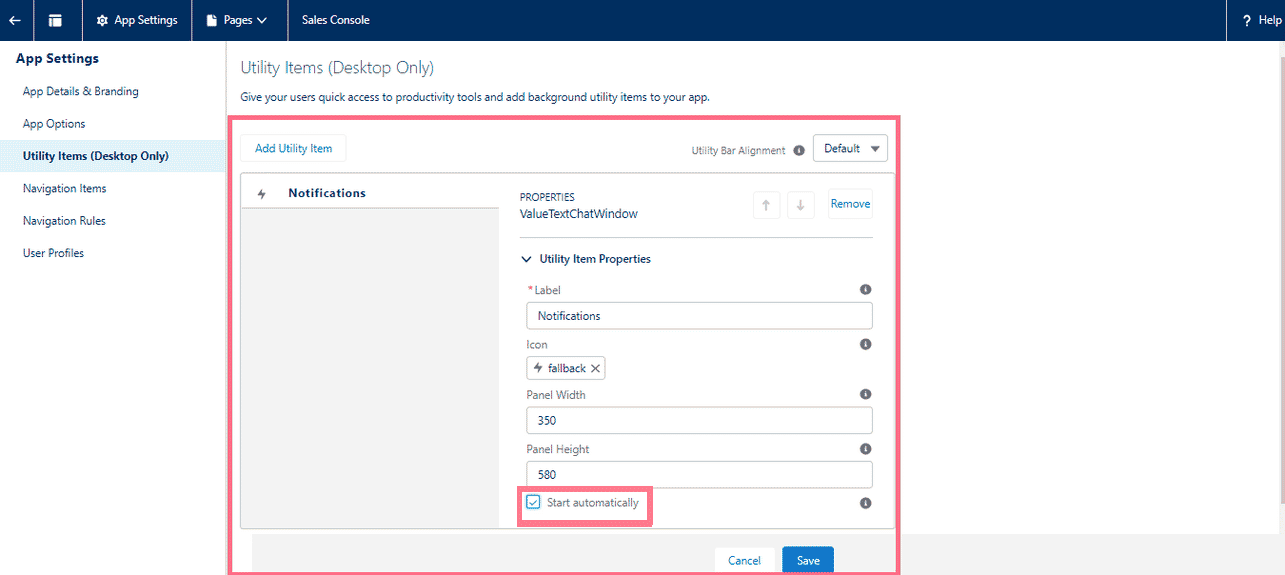
This opens the PROPERTIES panel, where you set the Label, Panel Width, and Panel Height, and check the Start automatically checkbox.

Recommended values:

  • Panel Width: 350
  • Panel Height: 580
Utility Items (Desktop Only) screen showing the Notifications utility item's Properties panel with Label set to Notifications, Panel Width set to 350, Panel Height set to 580, and the Start automatically checkbox checked.
Fig 04

Save your changes

Click Save.

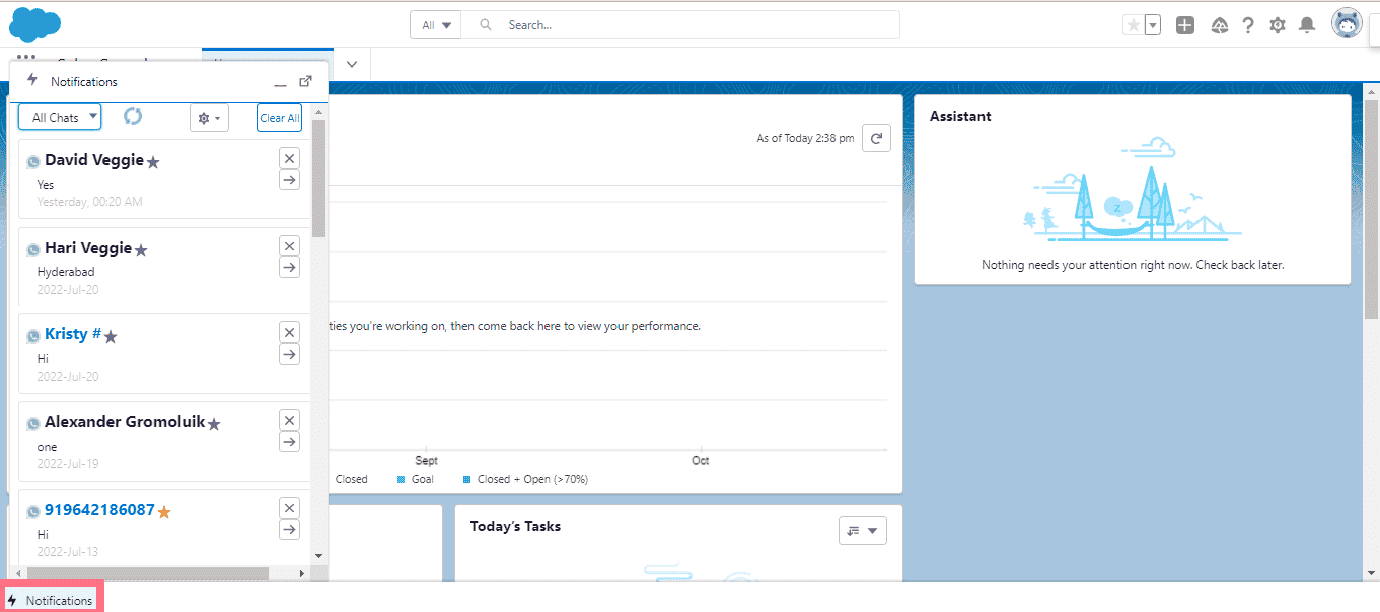
Sales Console with the Notifications utility tab open at the bottom of the screen, showing the ValueText Chat Window panel listing recent chats under an All Chats filter.
Fig 05
Was this helpful?
← PreviousSet up mobile notifications in Salesforce Next →Sending Messages from Flow in Salesforce
Docs/Chat console & conversations/Set up ValueText notifications in the Utility Bar

Set up ValueText notifications in the Utility Bar

Add the ValueText Chat Window to the Utility Bar of any Lightning app so your team can access it from every record and page, not just from a component dropped on a record layout.

Last updated 28 Nov 2025

Open Setup

Open Salesforce and click the gear icon, then select Setup.

Salesforce Sales Console home page with the gear icon menu open and Setup highlighted.
Fig 01

Open App Manager

Search for App Manager in Quick Find and open it from the results below the search box. App Manager lists every Lightning application in your org.

Choose the Lightning app you want to configure (this guide uses Sales Console) and click Edit.

Salesforce Setup page with App Manager typed into the Quick Find search box and the Edit option open in the dropdown for the Sales Console row in the Lightning Experience App Manager list.
Fig 02

Add the ValueText Chat Window utility item

On the app's edit page, click Utility Items (Desktop Only). This opens the Utility Items page.

Click Add Utility Item, then select ValueText Chat Window from the Custom Managed section of the dropdown.

Sales Console app edit page on the Utility Items (Desktop Only) screen, showing the Add Utility Item button and the utility item dropdown list with ValueTextChatWindow highlighted in the Custom Managed section.
Fig 03

Set the panel properties

This opens the PROPERTIES panel, where you set the Label, Panel Width, and Panel Height, and check the Start automatically checkbox.

Recommended values:

  • Panel Width: 350
  • Panel Height: 580
Utility Items (Desktop Only) screen showing the Notifications utility item's Properties panel with Label set to Notifications, Panel Width set to 350, Panel Height set to 580, and the Start automatically checkbox checked.
Fig 04

Save your changes

Click Save.

Sales Console with the Notifications utility tab open at the bottom of the screen, showing the ValueText Chat Window panel listing recent chats under an All Chats filter.
Fig 05
Was this helpful?
← PreviousSet up mobile notifications in Salesforce Next →Sending Messages from Flow in Salesforce
Docs/Chat console & conversations/Set up ValueText notifications in the Utility Bar

Set up ValueText notifications in the Utility Bar

Add the ValueText Chat Window to the Utility Bar of any Lightning app so your team can access it from every record and page, not just from a component dropped on a record layout.

Last updated 28 Nov 2025

Open Setup

Open Salesforce and click the gear icon, then select Setup.

Salesforce Sales Console home page with the gear icon menu open and Setup highlighted.
Fig 01

Open App Manager

Search for App Manager in Quick Find and open it from the results below the search box. App Manager lists every Lightning application in your org.

Choose the Lightning app you want to configure (this guide uses Sales Console) and click Edit.

Salesforce Setup page with App Manager typed into the Quick Find search box and the Edit option open in the dropdown for the Sales Console row in the Lightning Experience App Manager list.
Fig 02

Add the ValueText Chat Window utility item

On the app's edit page, click Utility Items (Desktop Only). This opens the Utility Items page.

Click Add Utility Item, then select ValueText Chat Window from the Custom Managed section of the dropdown.

Sales Console app edit page on the Utility Items (Desktop Only) screen, showing the Add Utility Item button and the utility item dropdown list with ValueTextChatWindow highlighted in the Custom Managed section.
Fig 03

Set the panel properties

This opens the PROPERTIES panel, where you set the Label, Panel Width, and Panel Height, and check the Start automatically checkbox.

Recommended values:

  • Panel Width: 350
  • Panel Height: 580
Utility Items (Desktop Only) screen showing the Notifications utility item's Properties panel with Label set to Notifications, Panel Width set to 350, Panel Height set to 580, and the Start automatically checkbox checked.
Fig 04

Save your changes

Click Save.

Sales Console with the Notifications utility tab open at the bottom of the screen, showing the ValueText Chat Window panel listing recent chats under an All Chats filter.
Fig 05
Was this helpful?
← PreviousSet up mobile notifications in Salesforce Next →Sending Messages from Flow in Salesforce
Docs/Chat console & conversations/Set up ValueText notifications in the Utility Bar

Set up ValueText notifications in the Utility Bar

Add the ValueText Chat Window to the Utility Bar of any Lightning app so your team can access it from every record and page, not just from a component dropped on a record layout.

Last updated 28 Nov 2025

Open Setup

Open Salesforce and click the gear icon, then select Setup.

Salesforce Sales Console home page with the gear icon menu open and Setup highlighted.
Fig 01

Open App Manager

Search for App Manager in Quick Find and open it from the results below the search box. App Manager lists every Lightning application in your org.

Choose the Lightning app you want to configure (this guide uses Sales Console) and click Edit.

Salesforce Setup page with App Manager typed into the Quick Find search box and the Edit option open in the dropdown for the Sales Console row in the Lightning Experience App Manager list.
Fig 02

Add the ValueText Chat Window utility item

On the app's edit page, click Utility Items (Desktop Only). This opens the Utility Items page.

Click Add Utility Item, then select ValueText Chat Window from the Custom Managed section of the dropdown.

Sales Console app edit page on the Utility Items (Desktop Only) screen, showing the Add Utility Item button and the utility item dropdown list with ValueTextChatWindow highlighted in the Custom Managed section.
Fig 03

Set the panel properties

This opens the PROPERTIES panel, where you set the Label, Panel Width, and Panel Height, and check the Start automatically checkbox.

Recommended values:

  • Panel Width: 350
  • Panel Height: 580
Utility Items (Desktop Only) screen showing the Notifications utility item's Properties panel with Label set to Notifications, Panel Width set to 350, Panel Height set to 580, and the Start automatically checkbox checked.
Fig 04

Save your changes

Click Save.

Sales Console with the Notifications utility tab open at the bottom of the screen, showing the ValueText Chat Window panel listing recent chats under an All Chats filter.
Fig 05
Was this helpful?
← PreviousSet up mobile notifications in Salesforce Next →Sending Messages from Flow in Salesforce