Docs/Sending messages/Bulk Messaging from a List View

Bulk Messaging from a List View

This feature sends the same message to a list of records by selecting a list view. Add the Phone number field to that list view before you start.

Last updated 28 Nov 2025

Find the bulk texting tab

If the button isn't on your object's list view page, open the App Launcher and search for the List View Bulk Texting tab. It opens a page where you can search for the object by name; every list view for that object then loads.

Configure the send

  1. Select the list view you want to send messages to.
  2. Select the sender ID from the From (Sender ID) dropdown.
  3. Select the phone field where your record stores the number.
  4. Select a template access level if you're sending a template that has one assigned. If your template isn't assigned to any access level, it defaults to public.
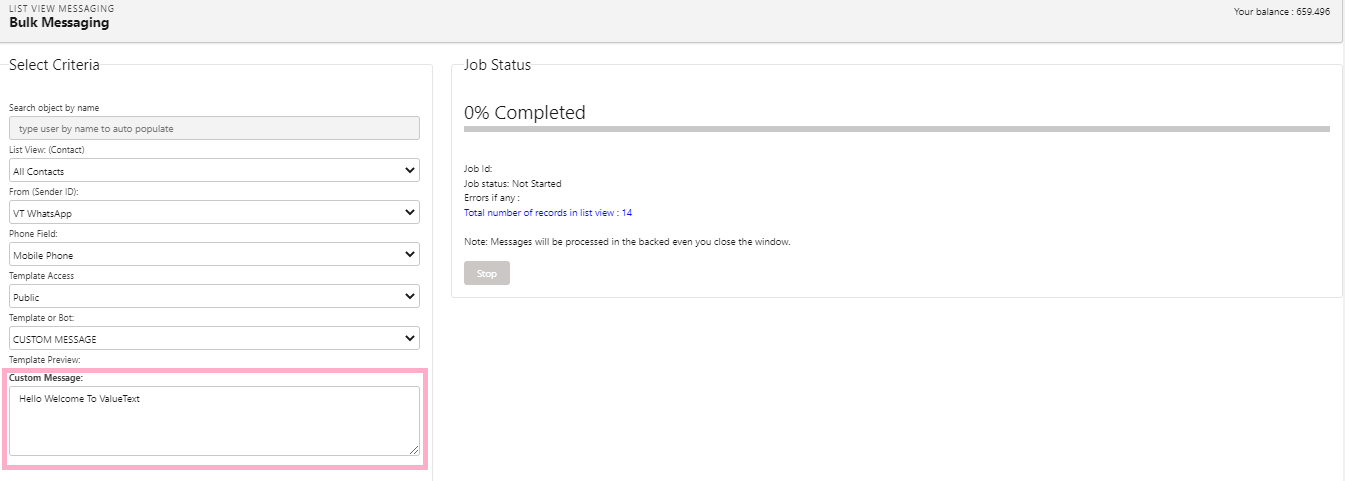
  5. Select the template you want to send, or choose CUSTOM MESSAGE to open a text box below the dropdown where you can type your own message.
  6. Select a channel. Default applies automatically; if your Sender ID is configured for both SMS and WhatsApp, choose your preferred channel instead.

Send with a template
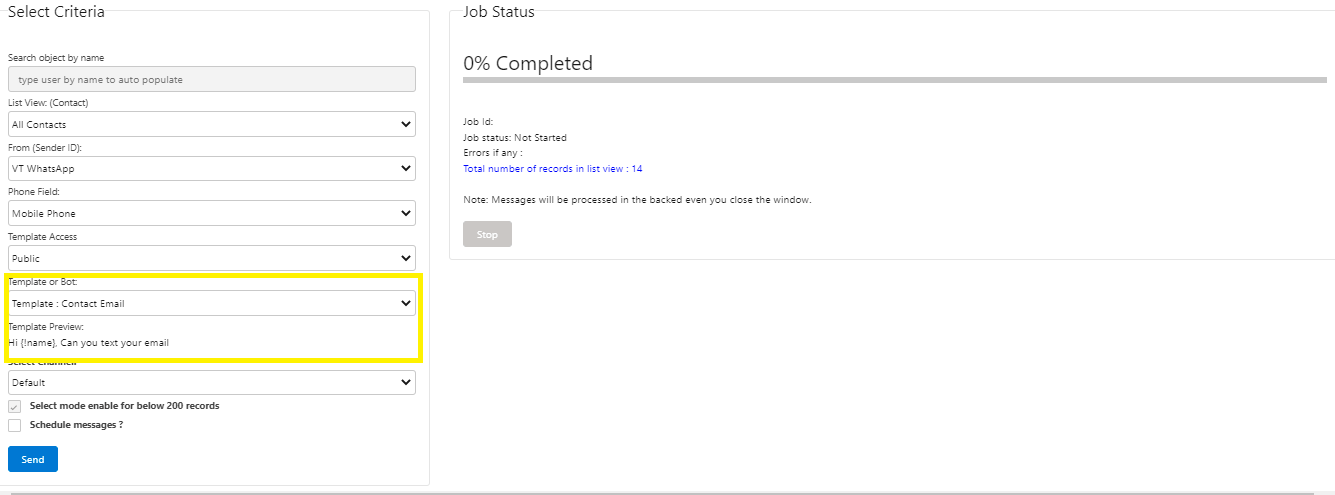
Salesforce List View Bulk Messaging panel with Template or Bot set to
Fig 01

Send with free text

Salesforce List View Bulk Messaging panel with Template or Bot set to CUSTOM MESSAGE and a Custom Message box below it reading
Fig 02

Schedule messages (optional)

  1. If you want to send at a specific time, check Schedule messages?. The schedule settings appear on the right side; fill in the options you need.
Salesforce List View Bulk Messaging panel with Template or Bot set to CUSTOM MESSAGE and a Custom Message box below it reading
Fig 03

Preview and send

  1. If your list view has fewer than 500 records, you can see a preview. Records show a HOLD status if they don't have a phone number or have opt-out enabled.
  2. When you send with a template, merge fields auto-fill with the record's data.
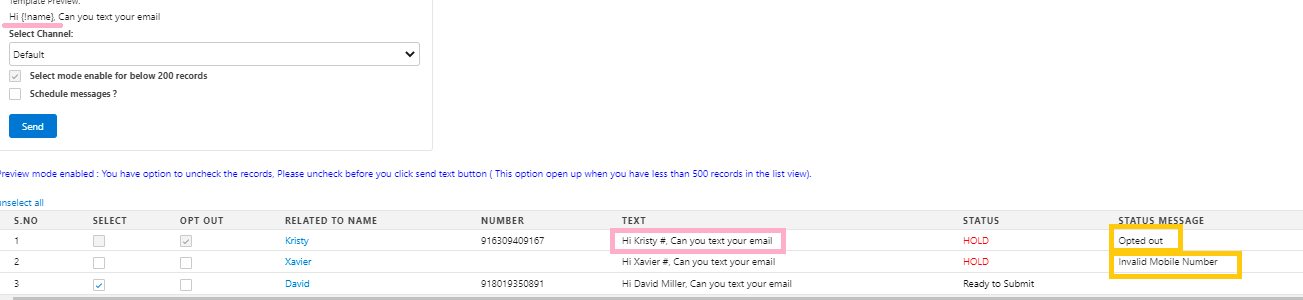
Salesforce bulk messaging preview table listing records with their text, status, and status message, showing a HOLD status for an opted-out record and for a record with an invalid mobile number.
Fig 04
  1. Click Send to send the messages.

Special features

  • Send messages to any number of records at once by preparing a list view.
  • View the status of each message in the Message Bucket object.
Was this helpful?
← PreviousBulk Messaging in Salesforce Next →Send Bulk Messages from a CSV File
Docs/Sending messages/Bulk Messaging from a List View

Bulk Messaging from a List View

This feature sends the same message to a list of records by selecting a list view. Add the Phone number field to that list view before you start.

Last updated 28 Nov 2025

Find the bulk texting tab

If the button isn't on your object's list view page, open the App Launcher and search for the List View Bulk Texting tab. It opens a page where you can search for the object by name; every list view for that object then loads.

Configure the send

  1. Select the list view you want to send messages to.
  2. Select the sender ID from the From (Sender ID) dropdown.
  3. Select the phone field where your record stores the number.
  4. Select a template access level if you're sending a template that has one assigned. If your template isn't assigned to any access level, it defaults to public.
  5. Select the template you want to send, or choose CUSTOM MESSAGE to open a text box below the dropdown where you can type your own message.
  6. Select a channel. Default applies automatically; if your Sender ID is configured for both SMS and WhatsApp, choose your preferred channel instead.

Send with a template

Salesforce List View Bulk Messaging panel with Template or Bot set to
Fig 01

Send with free text

Salesforce List View Bulk Messaging panel with Template or Bot set to CUSTOM MESSAGE and a Custom Message box below it reading
Fig 02

Schedule messages (optional)

  1. If you want to send at a specific time, check Schedule messages?. The schedule settings appear on the right side; fill in the options you need.
Salesforce List View Bulk Messaging panel with Template or Bot set to CUSTOM MESSAGE and a Custom Message box below it reading
Fig 03

Preview and send

  1. If your list view has fewer than 500 records, you can see a preview. Records show a HOLD status if they don't have a phone number or have opt-out enabled.
  2. When you send with a template, merge fields auto-fill with the record's data.
Salesforce bulk messaging preview table listing records with their text, status, and status message, showing a HOLD status for an opted-out record and for a record with an invalid mobile number.
Fig 04
  1. Click Send to send the messages.

Special features

  • Send messages to any number of records at once by preparing a list view.
  • View the status of each message in the Message Bucket object.
Was this helpful?
← PreviousBulk Messaging in Salesforce Next →Send Bulk Messages from a CSV File
Docs/Sending messages/Bulk Messaging from a List View

Bulk Messaging from a List View

This feature sends the same message to a list of records by selecting a list view. Add the Phone number field to that list view before you start.

Last updated 28 Nov 2025

Find the bulk texting tab

If the button isn't on your object's list view page, open the App Launcher and search for the List View Bulk Texting tab. It opens a page where you can search for the object by name; every list view for that object then loads.

Configure the send

  1. Select the list view you want to send messages to.
  2. Select the sender ID from the From (Sender ID) dropdown.
  3. Select the phone field where your record stores the number.
  4. Select a template access level if you're sending a template that has one assigned. If your template isn't assigned to any access level, it defaults to public.
  5. Select the template you want to send, or choose CUSTOM MESSAGE to open a text box below the dropdown where you can type your own message.
  6. Select a channel. Default applies automatically; if your Sender ID is configured for both SMS and WhatsApp, choose your preferred channel instead.

Send with a template

Salesforce List View Bulk Messaging panel with Template or Bot set to
Fig 01

Send with free text

Salesforce List View Bulk Messaging panel with Template or Bot set to CUSTOM MESSAGE and a Custom Message box below it reading
Fig 02

Schedule messages (optional)

  1. If you want to send at a specific time, check Schedule messages?. The schedule settings appear on the right side; fill in the options you need.
Salesforce List View Bulk Messaging panel with Template or Bot set to CUSTOM MESSAGE and a Custom Message box below it reading
Fig 03

Preview and send

  1. If your list view has fewer than 500 records, you can see a preview. Records show a HOLD status if they don't have a phone number or have opt-out enabled.
  2. When you send with a template, merge fields auto-fill with the record's data.
Salesforce bulk messaging preview table listing records with their text, status, and status message, showing a HOLD status for an opted-out record and for a record with an invalid mobile number.
Fig 04
  1. Click Send to send the messages.

Special features

  • Send messages to any number of records at once by preparing a list view.
  • View the status of each message in the Message Bucket object.
Was this helpful?
← PreviousBulk Messaging in Salesforce Next →Send Bulk Messages from a CSV File
Docs/Sending messages/Bulk Messaging from a List View

Bulk Messaging from a List View

This feature sends the same message to a list of records by selecting a list view. Add the Phone number field to that list view before you start.

Last updated 28 Nov 2025

Find the bulk texting tab

If the button isn't on your object's list view page, open the App Launcher and search for the List View Bulk Texting tab. It opens a page where you can search for the object by name; every list view for that object then loads.

Configure the send

  1. Select the list view you want to send messages to.
  2. Select the sender ID from the From (Sender ID) dropdown.
  3. Select the phone field where your record stores the number.
  4. Select a template access level if you're sending a template that has one assigned. If your template isn't assigned to any access level, it defaults to public.
  5. Select the template you want to send, or choose CUSTOM MESSAGE to open a text box below the dropdown where you can type your own message.
  6. Select a channel. Default applies automatically; if your Sender ID is configured for both SMS and WhatsApp, choose your preferred channel instead.

Send with a template

Salesforce List View Bulk Messaging panel with Template or Bot set to
Fig 01

Send with free text

Salesforce List View Bulk Messaging panel with Template or Bot set to CUSTOM MESSAGE and a Custom Message box below it reading
Fig 02

Schedule messages (optional)

  1. If you want to send at a specific time, check Schedule messages?. The schedule settings appear on the right side; fill in the options you need.
Salesforce List View Bulk Messaging panel with Template or Bot set to CUSTOM MESSAGE and a Custom Message box below it reading
Fig 03

Preview and send

  1. If your list view has fewer than 500 records, you can see a preview. Records show a HOLD status if they don't have a phone number or have opt-out enabled.
  2. When you send with a template, merge fields auto-fill with the record's data.
Salesforce bulk messaging preview table listing records with their text, status, and status message, showing a HOLD status for an opted-out record and for a record with an invalid mobile number.
Fig 04
  1. Click Send to send the messages.

Special features

  • Send messages to any number of records at once by preparing a list view.
  • View the status of each message in the Message Bucket object.
Was this helpful?
← PreviousBulk Messaging in Salesforce Next →Send Bulk Messages from a CSV File