Docs/Chat console & conversations/Filter Messages in Converse View for Bulk Jobs

Filter Messages in Converse View for Bulk Jobs

Converse View lets you apply filters to view and manage messages tied to bulk jobs. The available filters are User Based, Sender ID, Bulk Job, Date, Date Range, and Label. The steps below cover each one.

Last updated 28 Nov 2025

Access Converse View

  1. Click the App Launcher icon to open the applications list.
  2. Search for Converse View in the App Launcher search bar.
  3. Click Converse View to open it.
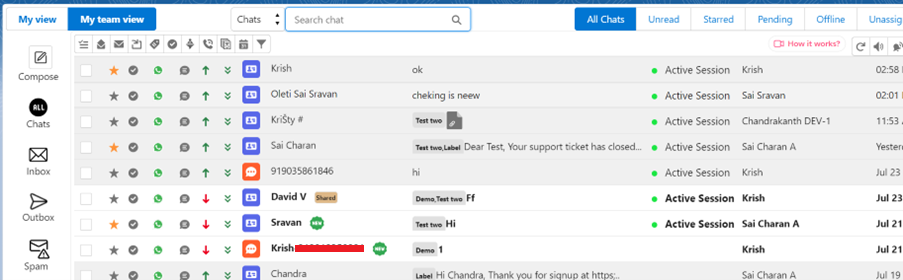
Converse View chat list with My view and My team view tabs, an All Chats status bar, and columns showing each chat's channel icon, message preview, session status, and assigned user.
Fig 01

Filter by user

  1. Click Choose Users in the toolbar to filter records by user.
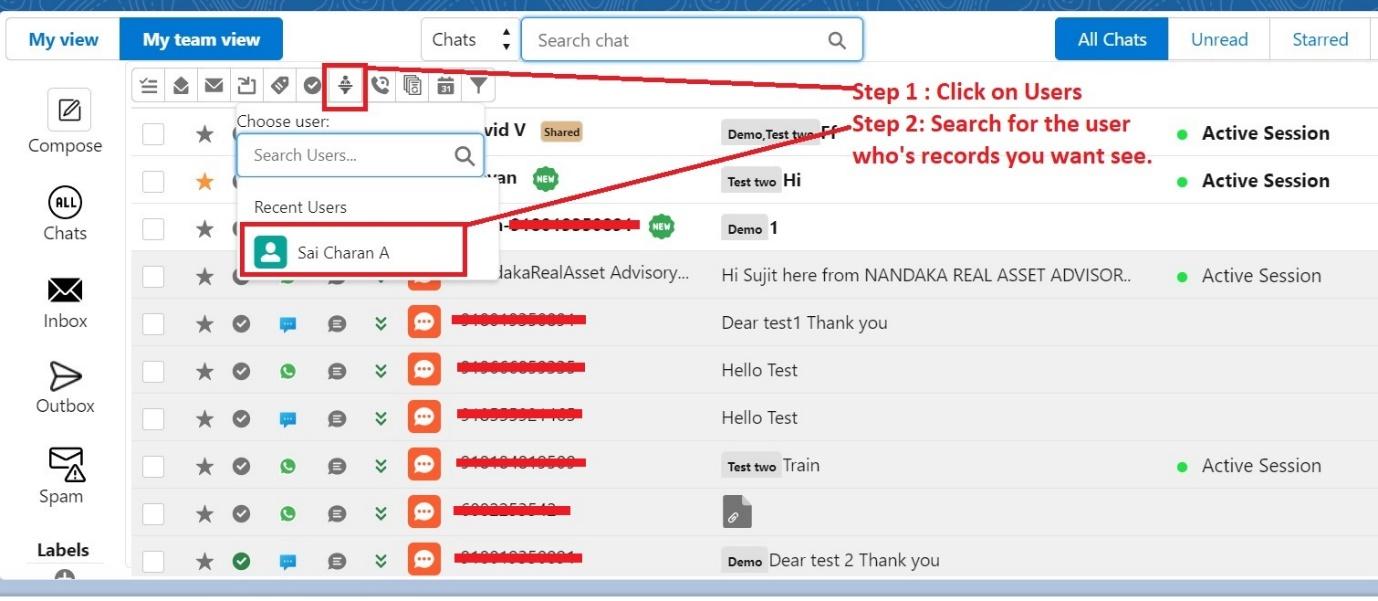
Converse View toolbar with the Choose Users filter open, showing a user search box and Sai Charan A listed under Recent Users, annotated Step 1: Click on Users and Step 2: Search for the user whose records you want to see.
Fig 02
  1. Search for the specific user whose records you want to see.
  2. The list updates to show only records tied to the selected user.
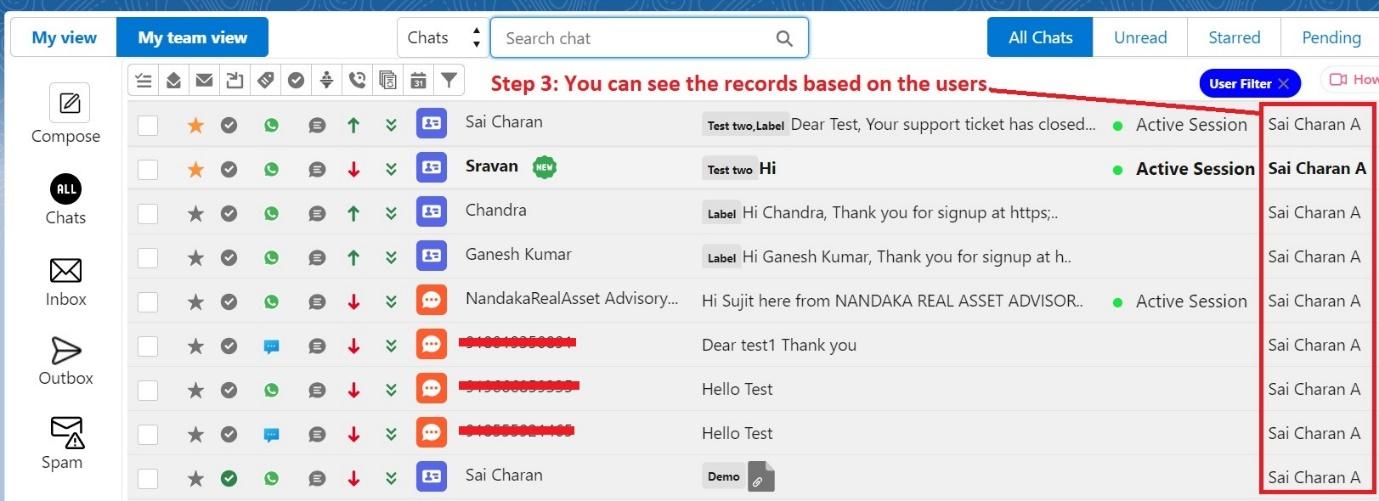
Converse View chat list filtered by user, with a blue User Filter tag next to the search bar and the Sai Charan A column highlighted on every row, annotated Step 3: You can see the records based on the users.
Fig 03

Filter by sender ID

  1. Select the Sender ID icon to view the available sender IDs.
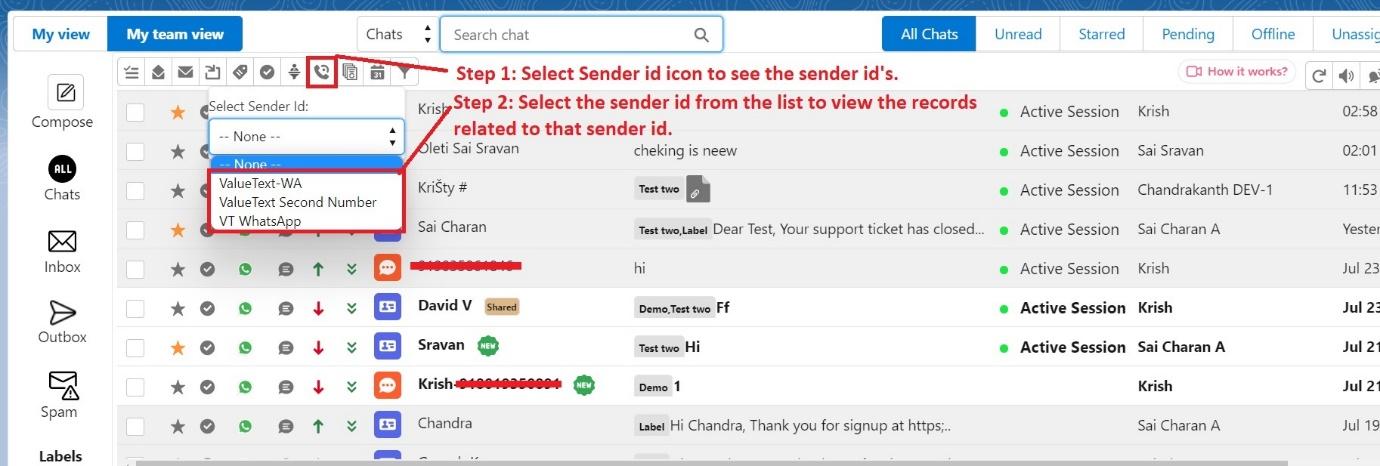
Converse View toolbar with the Sender Id filter open, listing ValueText-WA, ValueText Second Number, and VT WhatsApp, annotated Step 1: Select Sender id icon to see the sender id's and Step 2: Select the sender id from the list to view the records related to that sender id.
Fig 04
  1. Choose a specific sender ID from the list to view records tied to that sender.

Filter by bulk job

  1. To see records tied to a specific bulk job, select the Bulk Job icon.
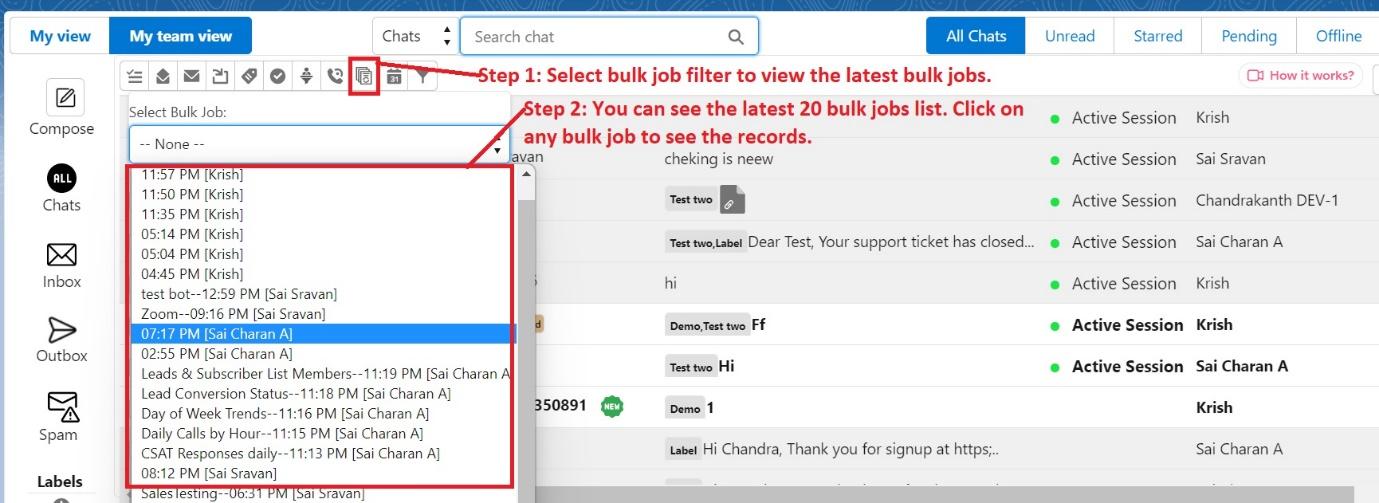
Converse View toolbar with the Select Bulk Job dropdown open, listing recent bulk jobs by time and sender, annotated Step 1: Select bulk job filter to view the latest bulk jobs and Step 2: You can see the latest 20 bulk jobs list, click on any bulk job to see the records.
Fig 05
  1. The dropdown lists the latest 20 bulk jobs.
  2. Choose the bulk job you want from the list to view its records.

Filter by date

  1. Click the Date icon.
  2. A calendar opens.
  3. Select any date on the calendar to view records created on that date.
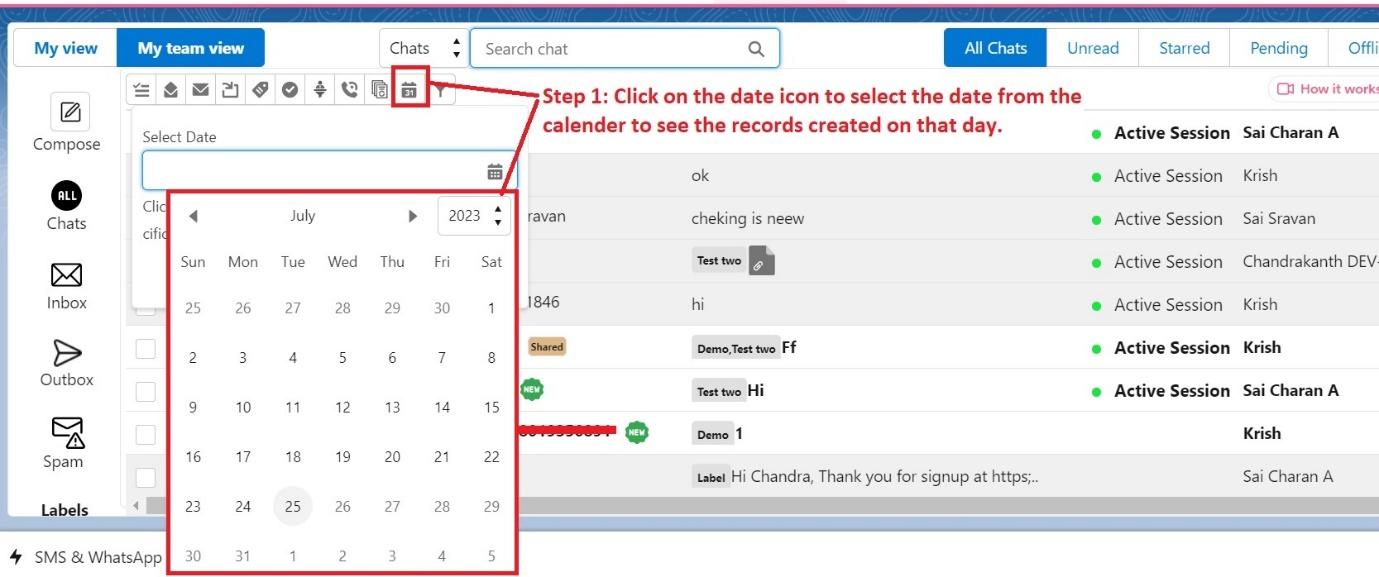
Converse View toolbar with the Select Date calendar open to July 2023, annotated Step 1: Click on the date icon to select the date from the calendar to see the records created on that day.
Fig 06

Filter by date range

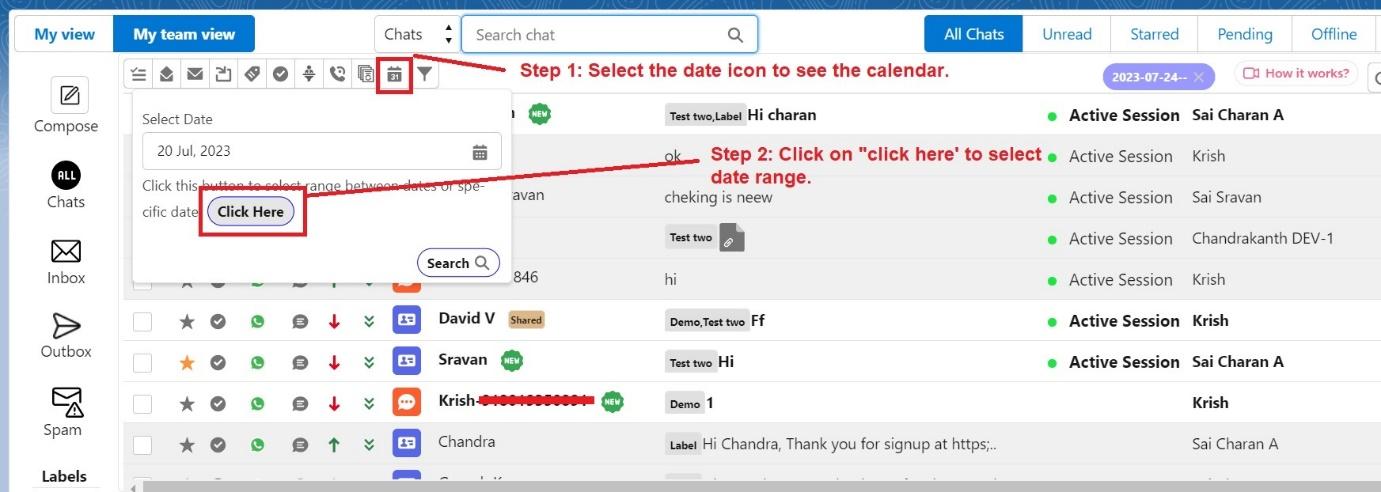
  1. Click the Date icon.
Converse View toolbar with the Select Date panel open showing a chosen date of 20 Jul 2023 and a Click Here button, annotated Step 1: Select the date icon to see the calendar and Step 2: Click on Click Here to select date range.
Fig 07
  1. Click Click Here to choose a date range.
  2. Select the start and end dates to view records created within that range.
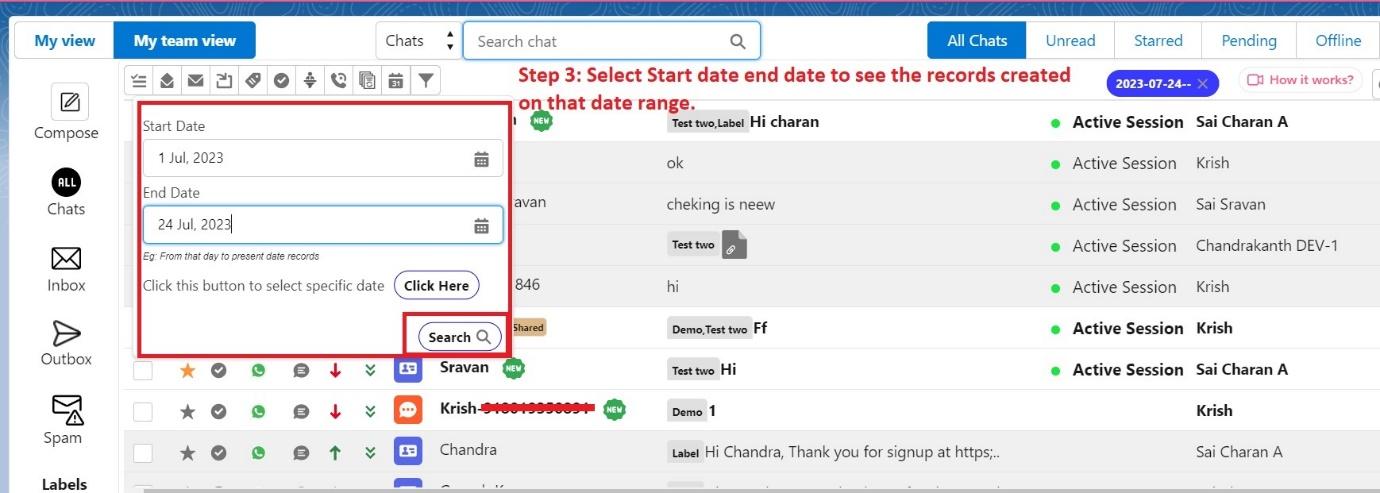
Converse View toolbar with the date range panel open, showing Start Date 1 Jul 2023 and End Date 24 Jul 2023 fields plus a Search button, annotated Step 3: Select Start date end date to see the records created on that date range.
Fig 08

Filter by label

  1. To see records assigned to a specific label, select the Label icon.
  2. Choose the label you want from the list, then click Apply to filter the records.
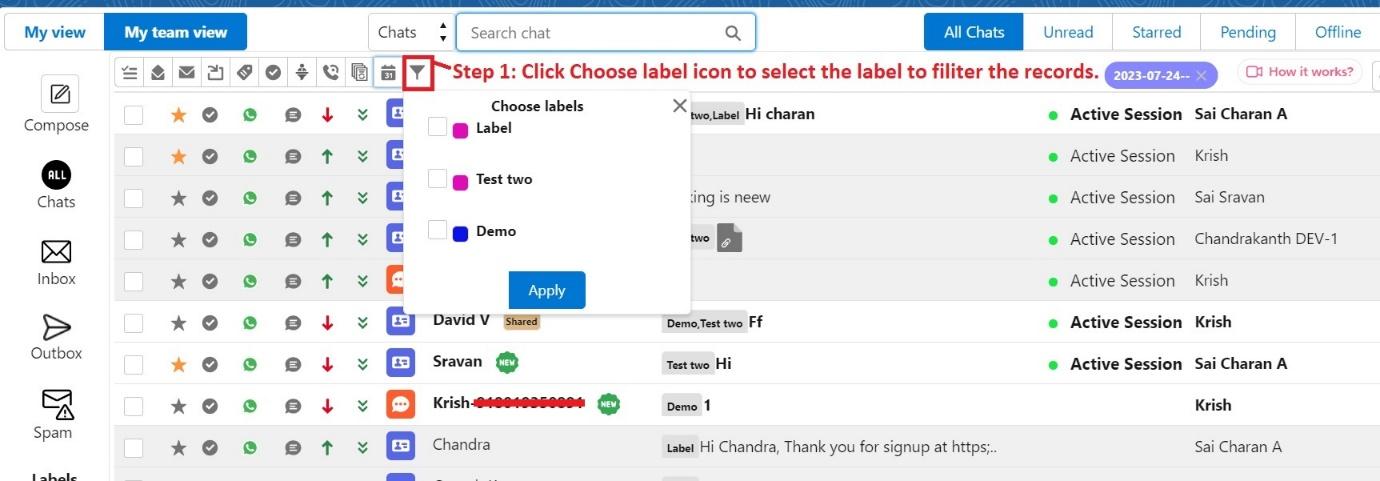
Converse View toolbar with the Choose labels panel open, listing Label, Test two, and Demo checkboxes and an Apply button, annotated Step 1: Click Choose label icon to select the label to filter the records.
Fig 09

Summary

The filters in Converse View let you sort and view messages tied to bulk jobs quickly, making it easier to manage your communication.

Was this helpful?
← PreviousUsing Converse View in Salesforce Next →Chat Sessions in ValueText
Docs/Chat console & conversations/Filter Messages in Converse View for Bulk Jobs

Filter Messages in Converse View for Bulk Jobs

Converse View lets you apply filters to view and manage messages tied to bulk jobs. The available filters are User Based, Sender ID, Bulk Job, Date, Date Range, and Label. The steps below cover each one.

Last updated 28 Nov 2025

Access Converse View

  1. Click the App Launcher icon to open the applications list.
  2. Search for Converse View in the App Launcher search bar.
  3. Click Converse View to open it.
Converse View chat list with My view and My team view tabs, an All Chats status bar, and columns showing each chat's channel icon, message preview, session status, and assigned user.
Fig 01

Filter by user

  1. Click Choose Users in the toolbar to filter records by user.
Converse View toolbar with the Choose Users filter open, showing a user search box and Sai Charan A listed under Recent Users, annotated Step 1: Click on Users and Step 2: Search for the user whose records you want to see.
Fig 02
  1. Search for the specific user whose records you want to see.
  2. The list updates to show only records tied to the selected user.
Converse View chat list filtered by user, with a blue User Filter tag next to the search bar and the Sai Charan A column highlighted on every row, annotated Step 3: You can see the records based on the users.
Fig 03

Filter by sender ID

  1. Select the Sender ID icon to view the available sender IDs.
Converse View toolbar with the Sender Id filter open, listing ValueText-WA, ValueText Second Number, and VT WhatsApp, annotated Step 1: Select Sender id icon to see the sender id's and Step 2: Select the sender id from the list to view the records related to that sender id.
Fig 04
  1. Choose a specific sender ID from the list to view records tied to that sender.

Filter by bulk job

  1. To see records tied to a specific bulk job, select the Bulk Job icon.
Converse View toolbar with the Select Bulk Job dropdown open, listing recent bulk jobs by time and sender, annotated Step 1: Select bulk job filter to view the latest bulk jobs and Step 2: You can see the latest 20 bulk jobs list, click on any bulk job to see the records.
Fig 05
  1. The dropdown lists the latest 20 bulk jobs.
  2. Choose the bulk job you want from the list to view its records.

Filter by date

  1. Click the Date icon.
  2. A calendar opens.
  3. Select any date on the calendar to view records created on that date.
Converse View toolbar with the Select Date calendar open to July 2023, annotated Step 1: Click on the date icon to select the date from the calendar to see the records created on that day.
Fig 06

Filter by date range

  1. Click the Date icon.
Converse View toolbar with the Select Date panel open showing a chosen date of 20 Jul 2023 and a Click Here button, annotated Step 1: Select the date icon to see the calendar and Step 2: Click on Click Here to select date range.
Fig 07
  1. Click Click Here to choose a date range.
  2. Select the start and end dates to view records created within that range.
Converse View toolbar with the date range panel open, showing Start Date 1 Jul 2023 and End Date 24 Jul 2023 fields plus a Search button, annotated Step 3: Select Start date end date to see the records created on that date range.
Fig 08

Filter by label

  1. To see records assigned to a specific label, select the Label icon.
  2. Choose the label you want from the list, then click Apply to filter the records.
Converse View toolbar with the Choose labels panel open, listing Label, Test two, and Demo checkboxes and an Apply button, annotated Step 1: Click Choose label icon to select the label to filter the records.
Fig 09

Summary

The filters in Converse View let you sort and view messages tied to bulk jobs quickly, making it easier to manage your communication.

Was this helpful?
← PreviousUsing Converse View in Salesforce Next →Chat Sessions in ValueText
Docs/Chat console & conversations/Filter Messages in Converse View for Bulk Jobs

Filter Messages in Converse View for Bulk Jobs

Converse View lets you apply filters to view and manage messages tied to bulk jobs. The available filters are User Based, Sender ID, Bulk Job, Date, Date Range, and Label. The steps below cover each one.

Last updated 28 Nov 2025

Access Converse View

  1. Click the App Launcher icon to open the applications list.
  2. Search for Converse View in the App Launcher search bar.
  3. Click Converse View to open it.
Converse View chat list with My view and My team view tabs, an All Chats status bar, and columns showing each chat's channel icon, message preview, session status, and assigned user.
Fig 01

Filter by user

  1. Click Choose Users in the toolbar to filter records by user.
Converse View toolbar with the Choose Users filter open, showing a user search box and Sai Charan A listed under Recent Users, annotated Step 1: Click on Users and Step 2: Search for the user whose records you want to see.
Fig 02
  1. Search for the specific user whose records you want to see.
  2. The list updates to show only records tied to the selected user.
Converse View chat list filtered by user, with a blue User Filter tag next to the search bar and the Sai Charan A column highlighted on every row, annotated Step 3: You can see the records based on the users.
Fig 03

Filter by sender ID

  1. Select the Sender ID icon to view the available sender IDs.
Converse View toolbar with the Sender Id filter open, listing ValueText-WA, ValueText Second Number, and VT WhatsApp, annotated Step 1: Select Sender id icon to see the sender id's and Step 2: Select the sender id from the list to view the records related to that sender id.
Fig 04
  1. Choose a specific sender ID from the list to view records tied to that sender.

Filter by bulk job

  1. To see records tied to a specific bulk job, select the Bulk Job icon.
Converse View toolbar with the Select Bulk Job dropdown open, listing recent bulk jobs by time and sender, annotated Step 1: Select bulk job filter to view the latest bulk jobs and Step 2: You can see the latest 20 bulk jobs list, click on any bulk job to see the records.
Fig 05
  1. The dropdown lists the latest 20 bulk jobs.
  2. Choose the bulk job you want from the list to view its records.

Filter by date

  1. Click the Date icon.
  2. A calendar opens.
  3. Select any date on the calendar to view records created on that date.
Converse View toolbar with the Select Date calendar open to July 2023, annotated Step 1: Click on the date icon to select the date from the calendar to see the records created on that day.
Fig 06

Filter by date range

  1. Click the Date icon.
Converse View toolbar with the Select Date panel open showing a chosen date of 20 Jul 2023 and a Click Here button, annotated Step 1: Select the date icon to see the calendar and Step 2: Click on Click Here to select date range.
Fig 07
  1. Click Click Here to choose a date range.
  2. Select the start and end dates to view records created within that range.
Converse View toolbar with the date range panel open, showing Start Date 1 Jul 2023 and End Date 24 Jul 2023 fields plus a Search button, annotated Step 3: Select Start date end date to see the records created on that date range.
Fig 08

Filter by label

  1. To see records assigned to a specific label, select the Label icon.
  2. Choose the label you want from the list, then click Apply to filter the records.
Converse View toolbar with the Choose labels panel open, listing Label, Test two, and Demo checkboxes and an Apply button, annotated Step 1: Click Choose label icon to select the label to filter the records.
Fig 09

Summary

The filters in Converse View let you sort and view messages tied to bulk jobs quickly, making it easier to manage your communication.

Was this helpful?
← PreviousUsing Converse View in Salesforce Next →Chat Sessions in ValueText
Docs/Chat console & conversations/Filter Messages in Converse View for Bulk Jobs

Filter Messages in Converse View for Bulk Jobs

Converse View lets you apply filters to view and manage messages tied to bulk jobs. The available filters are User Based, Sender ID, Bulk Job, Date, Date Range, and Label. The steps below cover each one.

Last updated 28 Nov 2025

Access Converse View

  1. Click the App Launcher icon to open the applications list.
  2. Search for Converse View in the App Launcher search bar.
  3. Click Converse View to open it.
Converse View chat list with My view and My team view tabs, an All Chats status bar, and columns showing each chat's channel icon, message preview, session status, and assigned user.
Fig 01

Filter by user

  1. Click Choose Users in the toolbar to filter records by user.
Converse View toolbar with the Choose Users filter open, showing a user search box and Sai Charan A listed under Recent Users, annotated Step 1: Click on Users and Step 2: Search for the user whose records you want to see.
Fig 02
  1. Search for the specific user whose records you want to see.
  2. The list updates to show only records tied to the selected user.
Converse View chat list filtered by user, with a blue User Filter tag next to the search bar and the Sai Charan A column highlighted on every row, annotated Step 3: You can see the records based on the users.
Fig 03

Filter by sender ID

  1. Select the Sender ID icon to view the available sender IDs.
Converse View toolbar with the Sender Id filter open, listing ValueText-WA, ValueText Second Number, and VT WhatsApp, annotated Step 1: Select Sender id icon to see the sender id's and Step 2: Select the sender id from the list to view the records related to that sender id.
Fig 04
  1. Choose a specific sender ID from the list to view records tied to that sender.

Filter by bulk job

  1. To see records tied to a specific bulk job, select the Bulk Job icon.
Converse View toolbar with the Select Bulk Job dropdown open, listing recent bulk jobs by time and sender, annotated Step 1: Select bulk job filter to view the latest bulk jobs and Step 2: You can see the latest 20 bulk jobs list, click on any bulk job to see the records.
Fig 05
  1. The dropdown lists the latest 20 bulk jobs.
  2. Choose the bulk job you want from the list to view its records.

Filter by date

  1. Click the Date icon.
  2. A calendar opens.
  3. Select any date on the calendar to view records created on that date.
Converse View toolbar with the Select Date calendar open to July 2023, annotated Step 1: Click on the date icon to select the date from the calendar to see the records created on that day.
Fig 06

Filter by date range

  1. Click the Date icon.
Converse View toolbar with the Select Date panel open showing a chosen date of 20 Jul 2023 and a Click Here button, annotated Step 1: Select the date icon to see the calendar and Step 2: Click on Click Here to select date range.
Fig 07
  1. Click Click Here to choose a date range.
  2. Select the start and end dates to view records created within that range.
Converse View toolbar with the date range panel open, showing Start Date 1 Jul 2023 and End Date 24 Jul 2023 fields plus a Search button, annotated Step 3: Select Start date end date to see the records created on that date range.
Fig 08

Filter by label

  1. To see records assigned to a specific label, select the Label icon.
  2. Choose the label you want from the list, then click Apply to filter the records.
Converse View toolbar with the Choose labels panel open, listing Label, Test two, and Demo checkboxes and an Apply button, annotated Step 1: Click Choose label icon to select the label to filter the records.
Fig 09

Summary

The filters in Converse View let you sort and view messages tied to bulk jobs quickly, making it easier to manage your communication.

Was this helpful?
← PreviousUsing Converse View in Salesforce Next →Chat Sessions in ValueText