Sending a Message from Flow #
Description: Messages can be triggered from a flow action by choosing to create a record. For example, changing a lead status to “Closed – Converted” can trigger a message to the customer without using the “Send SMS” button.
How to Send a Message from a Flow: #
Step 1: Define Flow Condition
Define the condition for your flow and specify when it should start.
Step 2: Add Flow Element
Choose “Create Records” from the “Add Elements” menu.
Step 3: Select Message Object
Select either “Message Bucket” or “SMS Outbox” based on the version you are using.
Step 4: Define Fields
Configure the following five fields as shown in the image below:
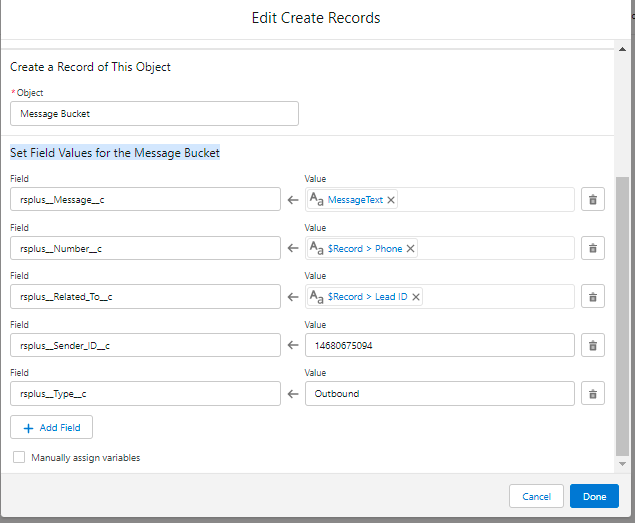
– Field: “Message (rsplus__Message__c)”
Description: Enter the text you want to send as a message in the resource variable as a text field.
– Field: “Number (To Phone)(rsplus__Number__c)”
Description: Choose “Field Reference” and select the phone number field from the relevant object (e.g., Lead).
– Field: “Related To(rsplus__Related_To__c)”
Description: Choose “Field Reference” and select the ID field from the relevant object (e.g., Contact). This helps create a history of the message.
– Field: “Sender ID (rsplus__Sender_ID__c)”
Description: Choose either “From address” or “Sender ID” of a message. Refer to your “Sender ID” tab for the appropriate value.
– Field: “Type(rsplus__Type__c)”
Description: Assign the value “Outbound” to this field.

Features that Stand Out:
– Custom and standard objects can be configured under the flow message.
Sending a Template from Flow #
Description: Templates can be triggered from a flow action by choosing to create a record. For example, changing a lead status to “Closed – Converted” can trigger a template to be sent to the customer without using the “Send SMS” button.
How to Send a Template from a Flow: #
Step 1: Define Flow Condition
Define the condition for your flow and specify when it should start.
Step 2: Add Flow Element
Choose “Create Records” from the “Add Elements” menu.
Step 3: Select Message Object
Select either “Message Bucket” or “SMS Outbox” based on the version you are using.
Step 4: Define Fields
Configure the following five fields as shown in the image below:
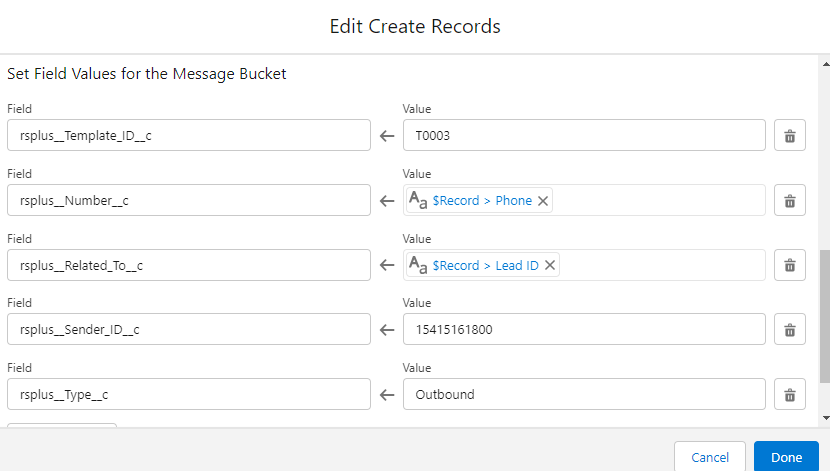
– Field: “Template ID (rsplus__Template_ID__c)”
Description: Enter the name of the template you have created (not the Salesforce ID of the template record).
– Field: “Number (To Phone)(rsplus__Number__c)”
Description: Choose “Field Reference” and select the phone number field from the relevant object (e.g., Lead).
– Field: “Related To(rsplus__Related_To__c)”
Description: Choose “Field Reference” and select the ID field from the relevant object (e.g., Contact). This helps create a history of the message.
– Field: “Sender ID (rsplus__Sender_ID__c)”
Description: Choose either “From address” or “Sender ID” of a message. Refer to your “Sender ID” tab for the appropriate value.
– Field: “Type(rsplus__Type__c)”
Description: Assign the value “Outbound” to this field.

Features that Stand Out: #
– Custom and standard objects can be configured under the flow message.
Trigger the Bot from Flow #
Description: A bot can be triggered from a flow action by choosing to create a record. For example, changing a lead status to “Closed – Converted” can trigger a bot to be sent to the customer without using the “Send SMS” button.
How to Send a Bot from a Flow: #
Step 1: Define Flow Condition
Define the condition for your flow and specify when it should start.
Step 2: Add Flow Element
Choose “Create Records” from the “Add Elements” menu.
Step 3: Select Message Object
Select either “Message Bucket” or “SMS Outbox” based on the version you are using.
Step 4: Define Fields
Configure the following five fields as shown in the image below:
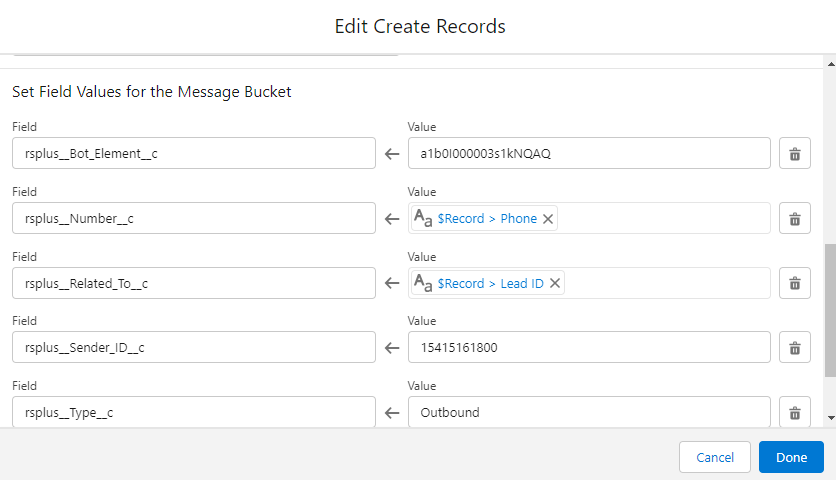
– Field: “Bot (rsplus__Bot_Element__c)”
Description: Enter the Bot ID that you want to send.
– Field: “Number (To Phone)(rsplus__Number__c)”
Description: Choose “Field Reference” and select the phone number field from the relevant object (e.g., Lead).
– Field: “Related To(rsplus__Related_To__c)”
Description: Choose “Field Reference” and select the ID field from the relevant object (e.g., Contact). This helps create a history of the message.
– Field: “Sender ID (rsplus__Sender_ID__c)”
Description: Choose either “From address” or “Sender ID” of a message. Refer to your “Sender ID” tab for the appropriate value.
– Field: “Type(rsplus__Type__c)”
Description: Assign the value “Outbound” to this field.
Features that Stand Out:
– Custom and standard objects can be configured under the flow message.
Steps to Select Bot Element ID:
Follow the steps below to select the Bot Element ID for sending a bot from a flow:
Step 1: Login to Salesforce Org
Login to your Salesforce organization using your credentials.
Step 2: Go to Bot’s Tab
Navigate to the “Bot’s” tab within Salesforce.
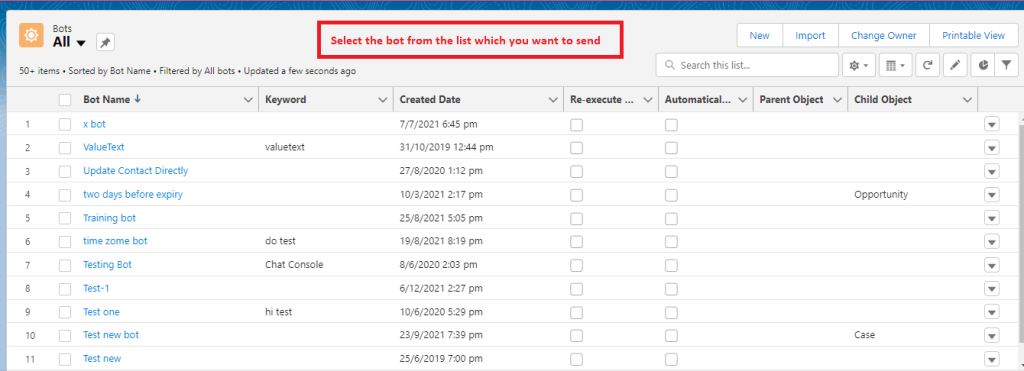
Step 3: Select the Bot
Choose the specific bot that you want to send from the available list.

Step 4: Access Bot Element Details
Access the details of the selected bot by clicking on it.
Step 5: Select Bot Element
From the bot details tab, select the desired bot element that you want to send.
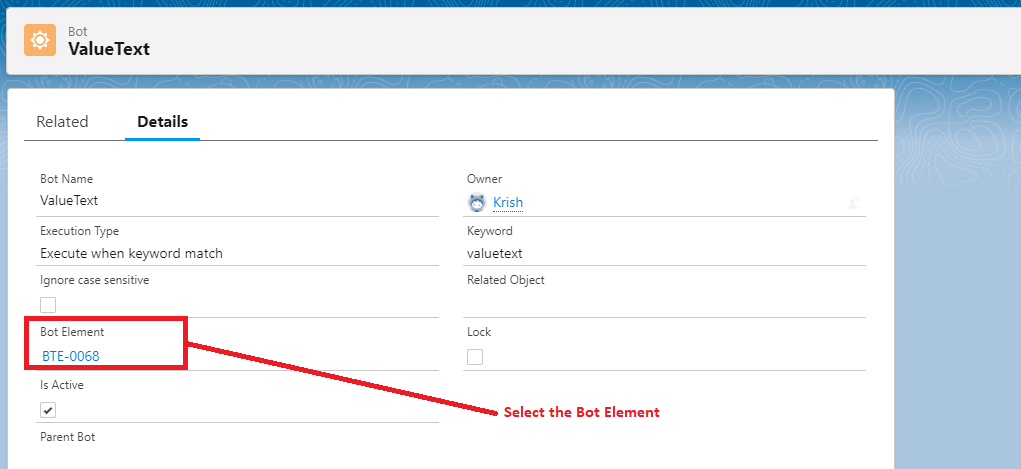
Step 6: Copy the Record ID
Copy the Record ID of the selected bot element.
Step 7: Paste Record ID in the Flow

Navigate back to your flow configuration and paste the copied Record ID in the “Bot (rsplus__Bot_Element__c)” field.
By following these steps, you will be able to select the appropriate Bot Element ID and integrate it into your flow for sending the bot message.
Note: The exact navigation and terminology may vary based on your Salesforce organization’s configuration and version.

