Docs/Templates & compliance/Opt-Out and Opt-In Management in Salesforce

Opt-Out and Opt-In Management in Salesforce

ValueText handles opt-in and opt-out through several mechanisms: keywords, record-level opt-out, org-level opt-out, time-based delivery, and an opt-out URL.

Last updated 28 Nov 2025
ValueText works with many service providers around the world, and most gateways support STOP and START. STOP triggers opt-out, START triggers opt-in. If a customer replies STOP, you cannot send any further messages from Salesforce using that same sender ID.

This opt-out applies at the sender ID level when you use a long code or short code. Since you can send from a different sender ID, this opt-out only blocks that one sender ID.

If you send messages under a shared sender ID (for example, ValueText itself), STOP will not help you, because the reply is not accepted by that sender ID. If you send with an alphanumeric sender ID instead, use the URL in the message text to let recipients opt out. See the Opt-In URL section below.

Record-Level Opt-Out

If you send manual messages from the record level using the chat console, this section applies to you.

The console locks automatically based on a checkbox enabled at the record level, for example an SMS opt-out checkbox on the Contact record.
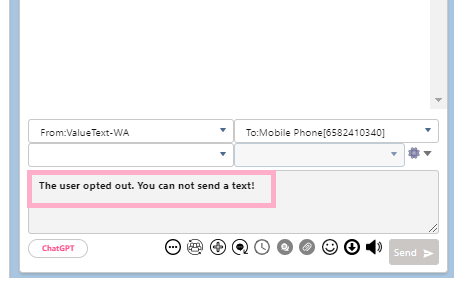
Salesforce Mini Chat Console with the message field locked and a highlighted message reading
Fig 01

There are multiple checkbox fields at the record level, so you need to choose which one controls text opt-out. Go to Salesforce > ValueText app (from the App menu) > ValueText Setup tab > Step 7: Text Opt Out Settings, then choose an object [1] and select a field [2].

This setting does not affect automation. You still need to check that same checkbox in your workflow, flow, process, or Apex criteria to stop sending messages there too.

Org-Level Opt-Out

The example above is record-level opt-out. But if the same phone number is stored on more than one record, for example a contact and a lead, record-level opt-out cannot stop sending to the lead if the checkbox is only enabled on the contact.

Org-level opt-out works by phone number, not by object. It stops messages to that number from any object, whether sent manually, from a flow, or from Apex.

To enable org-level opt-out, create a record on the Opted Numbers object.

Manual Opt-Out

The phone number must include the country code, with no spaces or special characters. For example, a U.S. number would be 1xxxxxxxxx.
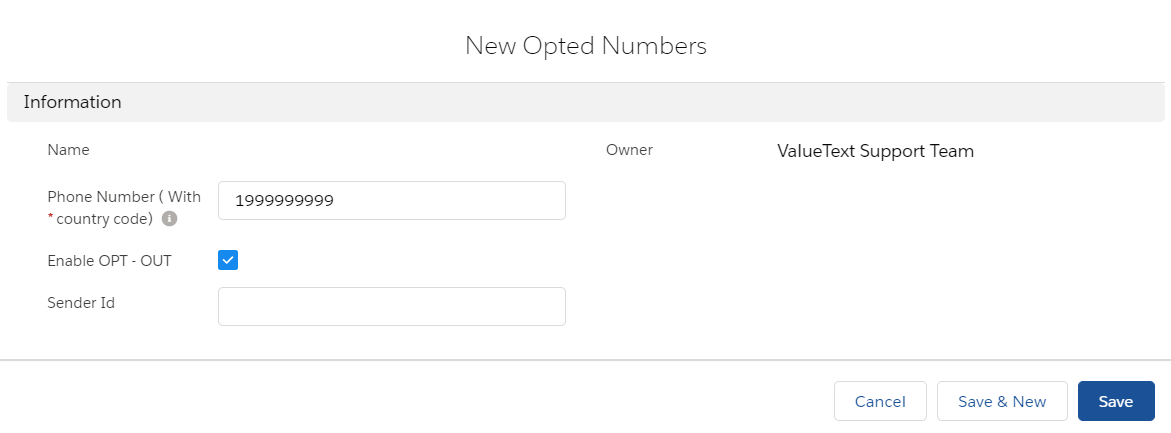
Salesforce New Opted Numbers record form with a Phone Number field, an Enable OPT-OUT checkbox checked, and a Sender Id field.
Fig 02

Set Enable OPT-OUT to true if you want to opt the number out.

Automate Opt-Out and Opt-In

You can automate the entire process so it triggers when you receive a message containing STOP or START (you can also define your own keywords in your local language).

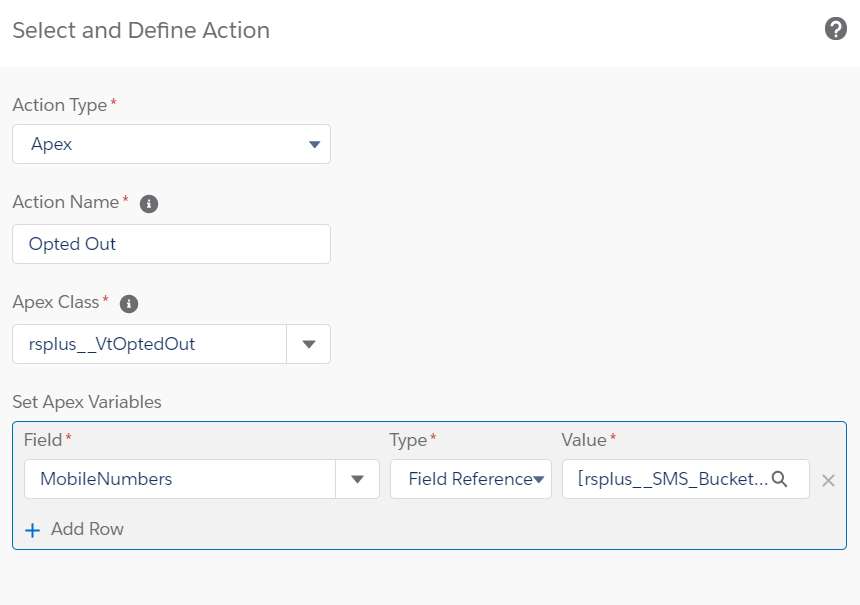
  1. Create a process builder on the message bucket.
  2. Set the criteria: Type__c equals "Inbound" and Message__c contains "STOP".
  3. Call the Apex action: VtOptedOut for STOP, VtOptedIn for START.
  4. Map the field: map MobileNumbers to Number__c from the message bucket.
Salesforce process builder Select and Define Action screen, Action Type Apex, Apex Class rsplus__VtOptedOut, with the MobileNumbers field mapped as a Field Reference to a value from the SMS bucket.
Fig 03

Time-Based Delivery

Time-based delivery matters in countries where you cannot send promotional messages outside business hours.

  1. Create business hours in Salesforce and define the available hours for each day.
  2. Map the Business Hours ID (the 18-digit record ID) to the rsplus__Business_Hours__c field on the message bucket when you send the message from the process builder.

When your flow fires, it checks the business hours before sending. If it is outside business hours, the message goes out after the next business start.

Opt-In URL

If you use the BASIC or STANDARD app, or you send messages with an alphanumeric sender ID, this option applies to you.

Create a site page, or reuse an existing one, and add the publicOptoutPage page under the Site Visualforce Pages section of your site.

Build the Public URL

The public URL takes this form:

Example
<site public url>/publicOptoutPage

Shorten that URL with Bitly, Google, or any other URL shortener, then include the shortened URL in your message text. Recipients can use it to unsubscribe, the same way an email unsubscribe link works.

Was this helpful?
← PreviousWhat Is a Sender ID in ValueText? Next →Configure Message-to-Activity Logging
Docs/Templates & compliance/Opt-Out and Opt-In Management in Salesforce

Opt-Out and Opt-In Management in Salesforce

ValueText handles opt-in and opt-out through several mechanisms: keywords, record-level opt-out, org-level opt-out, time-based delivery, and an opt-out URL.

Last updated 28 Nov 2025
ValueText works with many service providers around the world, and most gateways support STOP and START. STOP triggers opt-out, START triggers opt-in. If a customer replies STOP, you cannot send any further messages from Salesforce using that same sender ID.

This opt-out applies at the sender ID level when you use a long code or short code. Since you can send from a different sender ID, this opt-out only blocks that one sender ID.

If you send messages under a shared sender ID (for example, ValueText itself), STOP will not help you, because the reply is not accepted by that sender ID. If you send with an alphanumeric sender ID instead, use the URL in the message text to let recipients opt out. See the Opt-In URL section below.

Record-Level Opt-Out

If you send manual messages from the record level using the chat console, this section applies to you.

The console locks automatically based on a checkbox enabled at the record level, for example an SMS opt-out checkbox on the Contact record.

Salesforce Mini Chat Console with the message field locked and a highlighted message reading
Fig 01

There are multiple checkbox fields at the record level, so you need to choose which one controls text opt-out. Go to Salesforce > ValueText app (from the App menu) > ValueText Setup tab > Step 7: Text Opt Out Settings, then choose an object [1] and select a field [2].

This setting does not affect automation. You still need to check that same checkbox in your workflow, flow, process, or Apex criteria to stop sending messages there too.

Org-Level Opt-Out

The example above is record-level opt-out. But if the same phone number is stored on more than one record, for example a contact and a lead, record-level opt-out cannot stop sending to the lead if the checkbox is only enabled on the contact.

Org-level opt-out works by phone number, not by object. It stops messages to that number from any object, whether sent manually, from a flow, or from Apex.

To enable org-level opt-out, create a record on the Opted Numbers object.

Manual Opt-Out

The phone number must include the country code, with no spaces or special characters. For example, a U.S. number would be 1xxxxxxxxx.

Salesforce New Opted Numbers record form with a Phone Number field, an Enable OPT-OUT checkbox checked, and a Sender Id field.
Fig 02

Set Enable OPT-OUT to true if you want to opt the number out.

Automate Opt-Out and Opt-In

You can automate the entire process so it triggers when you receive a message containing STOP or START (you can also define your own keywords in your local language).

  1. Create a process builder on the message bucket.
  2. Set the criteria: Type__c equals "Inbound" and Message__c contains "STOP".
  3. Call the Apex action: VtOptedOut for STOP, VtOptedIn for START.
  4. Map the field: map MobileNumbers to Number__c from the message bucket.
Salesforce process builder Select and Define Action screen, Action Type Apex, Apex Class rsplus__VtOptedOut, with the MobileNumbers field mapped as a Field Reference to a value from the SMS bucket.
Fig 03

Time-Based Delivery

Time-based delivery matters in countries where you cannot send promotional messages outside business hours.

  1. Create business hours in Salesforce and define the available hours for each day.
  2. Map the Business Hours ID (the 18-digit record ID) to the rsplus__Business_Hours__c field on the message bucket when you send the message from the process builder.

When your flow fires, it checks the business hours before sending. If it is outside business hours, the message goes out after the next business start.

Opt-In URL

If you use the BASIC or STANDARD app, or you send messages with an alphanumeric sender ID, this option applies to you.

Create a site page, or reuse an existing one, and add the publicOptoutPage page under the Site Visualforce Pages section of your site.

Build the Public URL

The public URL takes this form:

Example
<site public url>/publicOptoutPage

Shorten that URL with Bitly, Google, or any other URL shortener, then include the shortened URL in your message text. Recipients can use it to unsubscribe, the same way an email unsubscribe link works.

Was this helpful?
← PreviousWhat Is a Sender ID in ValueText? Next →Configure Message-to-Activity Logging
Docs/Templates & compliance/Opt-Out and Opt-In Management in Salesforce

Opt-Out and Opt-In Management in Salesforce

ValueText handles opt-in and opt-out through several mechanisms: keywords, record-level opt-out, org-level opt-out, time-based delivery, and an opt-out URL.

Last updated 28 Nov 2025
ValueText works with many service providers around the world, and most gateways support STOP and START. STOP triggers opt-out, START triggers opt-in. If a customer replies STOP, you cannot send any further messages from Salesforce using that same sender ID.

This opt-out applies at the sender ID level when you use a long code or short code. Since you can send from a different sender ID, this opt-out only blocks that one sender ID.

If you send messages under a shared sender ID (for example, ValueText itself), STOP will not help you, because the reply is not accepted by that sender ID. If you send with an alphanumeric sender ID instead, use the URL in the message text to let recipients opt out. See the Opt-In URL section below.

Record-Level Opt-Out

If you send manual messages from the record level using the chat console, this section applies to you.

The console locks automatically based on a checkbox enabled at the record level, for example an SMS opt-out checkbox on the Contact record.

Salesforce Mini Chat Console with the message field locked and a highlighted message reading
Fig 01

There are multiple checkbox fields at the record level, so you need to choose which one controls text opt-out. Go to Salesforce > ValueText app (from the App menu) > ValueText Setup tab > Step 7: Text Opt Out Settings, then choose an object [1] and select a field [2].

This setting does not affect automation. You still need to check that same checkbox in your workflow, flow, process, or Apex criteria to stop sending messages there too.

Org-Level Opt-Out

The example above is record-level opt-out. But if the same phone number is stored on more than one record, for example a contact and a lead, record-level opt-out cannot stop sending to the lead if the checkbox is only enabled on the contact.

Org-level opt-out works by phone number, not by object. It stops messages to that number from any object, whether sent manually, from a flow, or from Apex.

To enable org-level opt-out, create a record on the Opted Numbers object.

Manual Opt-Out

The phone number must include the country code, with no spaces or special characters. For example, a U.S. number would be 1xxxxxxxxx.

Salesforce New Opted Numbers record form with a Phone Number field, an Enable OPT-OUT checkbox checked, and a Sender Id field.
Fig 02

Set Enable OPT-OUT to true if you want to opt the number out.

Automate Opt-Out and Opt-In

You can automate the entire process so it triggers when you receive a message containing STOP or START (you can also define your own keywords in your local language).

  1. Create a process builder on the message bucket.
  2. Set the criteria: Type__c equals "Inbound" and Message__c contains "STOP".
  3. Call the Apex action: VtOptedOut for STOP, VtOptedIn for START.
  4. Map the field: map MobileNumbers to Number__c from the message bucket.
Salesforce process builder Select and Define Action screen, Action Type Apex, Apex Class rsplus__VtOptedOut, with the MobileNumbers field mapped as a Field Reference to a value from the SMS bucket.
Fig 03

Time-Based Delivery

Time-based delivery matters in countries where you cannot send promotional messages outside business hours.

  1. Create business hours in Salesforce and define the available hours for each day.
  2. Map the Business Hours ID (the 18-digit record ID) to the rsplus__Business_Hours__c field on the message bucket when you send the message from the process builder.

When your flow fires, it checks the business hours before sending. If it is outside business hours, the message goes out after the next business start.

Opt-In URL

If you use the BASIC or STANDARD app, or you send messages with an alphanumeric sender ID, this option applies to you.

Create a site page, or reuse an existing one, and add the publicOptoutPage page under the Site Visualforce Pages section of your site.

Build the Public URL

The public URL takes this form:

Example
<site public url>/publicOptoutPage

Shorten that URL with Bitly, Google, or any other URL shortener, then include the shortened URL in your message text. Recipients can use it to unsubscribe, the same way an email unsubscribe link works.

Was this helpful?
← PreviousWhat Is a Sender ID in ValueText? Next →Configure Message-to-Activity Logging
Docs/Templates & compliance/Opt-Out and Opt-In Management in Salesforce

Opt-Out and Opt-In Management in Salesforce

ValueText handles opt-in and opt-out through several mechanisms: keywords, record-level opt-out, org-level opt-out, time-based delivery, and an opt-out URL.

Last updated 28 Nov 2025
ValueText works with many service providers around the world, and most gateways support STOP and START. STOP triggers opt-out, START triggers opt-in. If a customer replies STOP, you cannot send any further messages from Salesforce using that same sender ID.

This opt-out applies at the sender ID level when you use a long code or short code. Since you can send from a different sender ID, this opt-out only blocks that one sender ID.

If you send messages under a shared sender ID (for example, ValueText itself), STOP will not help you, because the reply is not accepted by that sender ID. If you send with an alphanumeric sender ID instead, use the URL in the message text to let recipients opt out. See the Opt-In URL section below.

Record-Level Opt-Out

If you send manual messages from the record level using the chat console, this section applies to you.

The console locks automatically based on a checkbox enabled at the record level, for example an SMS opt-out checkbox on the Contact record.

Salesforce Mini Chat Console with the message field locked and a highlighted message reading
Fig 01

There are multiple checkbox fields at the record level, so you need to choose which one controls text opt-out. Go to Salesforce > ValueText app (from the App menu) > ValueText Setup tab > Step 7: Text Opt Out Settings, then choose an object [1] and select a field [2].

This setting does not affect automation. You still need to check that same checkbox in your workflow, flow, process, or Apex criteria to stop sending messages there too.

Org-Level Opt-Out

The example above is record-level opt-out. But if the same phone number is stored on more than one record, for example a contact and a lead, record-level opt-out cannot stop sending to the lead if the checkbox is only enabled on the contact.

Org-level opt-out works by phone number, not by object. It stops messages to that number from any object, whether sent manually, from a flow, or from Apex.

To enable org-level opt-out, create a record on the Opted Numbers object.

Manual Opt-Out

The phone number must include the country code, with no spaces or special characters. For example, a U.S. number would be 1xxxxxxxxx.

Salesforce New Opted Numbers record form with a Phone Number field, an Enable OPT-OUT checkbox checked, and a Sender Id field.
Fig 02

Set Enable OPT-OUT to true if you want to opt the number out.

Automate Opt-Out and Opt-In

You can automate the entire process so it triggers when you receive a message containing STOP or START (you can also define your own keywords in your local language).

  1. Create a process builder on the message bucket.
  2. Set the criteria: Type__c equals "Inbound" and Message__c contains "STOP".
  3. Call the Apex action: VtOptedOut for STOP, VtOptedIn for START.
  4. Map the field: map MobileNumbers to Number__c from the message bucket.
Salesforce process builder Select and Define Action screen, Action Type Apex, Apex Class rsplus__VtOptedOut, with the MobileNumbers field mapped as a Field Reference to a value from the SMS bucket.
Fig 03

Time-Based Delivery

Time-based delivery matters in countries where you cannot send promotional messages outside business hours.

  1. Create business hours in Salesforce and define the available hours for each day.
  2. Map the Business Hours ID (the 18-digit record ID) to the rsplus__Business_Hours__c field on the message bucket when you send the message from the process builder.

When your flow fires, it checks the business hours before sending. If it is outside business hours, the message goes out after the next business start.

Opt-In URL

If you use the BASIC or STANDARD app, or you send messages with an alphanumeric sender ID, this option applies to you.

Create a site page, or reuse an existing one, and add the publicOptoutPage page under the Site Visualforce Pages section of your site.

Build the Public URL

The public URL takes this form:

Example
<site public url>/publicOptoutPage

Shorten that URL with Bitly, Google, or any other URL shortener, then include the shortened URL in your message text. Recipients can use it to unsubscribe, the same way an email unsubscribe link works.

Was this helpful?
← PreviousWhat Is a Sender ID in ValueText? Next →Configure Message-to-Activity Logging